Let’s face it — clean drinking water isn’t something we think about until it becomes a problem. Maybe the tap starts tasting a little weird. Maybe you’re heading off-grid for a few days and don’t trust that stream nearby. Or maybe you’re just curious — you like building things with your hands and want to try something both practical and kind of cool.
That’s where a diy water filter for drinking comes in. It’s not just some Pinterest-inspired craft. It’s a smart, simple, and surprisingly effective way to make sure your water is safer to consume, especially when bottled or filtered options aren’t around.
And no, you don’t need a fancy lab coat or a degree in chemistry. You just need a few materials, a bit of patience, and a healthy respect for clean water.
Why Even Bother with a Homemade Filter?
Well, for starters — not everyone has access to commercial filters, especially during emergencies or while traveling. And while modern filtration systems are great, they can be expensive, require replacement parts, or rely on electricity. A homemade filter? It’s off-grid, budget-friendly, and teaches you something valuable in the process.
It’s also a fantastic project if you’re a parent, a camper, or someone who just likes knowing how things work under the hood.
What You’ll Actually Need (Spoiler: Not Much)
A basic homemade filter works on gravity and layering. Picture this: water goes in the top, travels through several layers of different materials, and comes out cleaner at the bottom. That’s the gist of it.
Here’s your simple materials list:
- An empty plastic bottle or bucket
- Activated charcoal (or even crushed BBQ charcoal in a pinch — just rinse well)
- Clean sand (playground sand works fine)
- Small pebbles or gravel
- Coffee filter or clean cloth
- A rubber band or tape
- A knife or scissors to cut the bottle
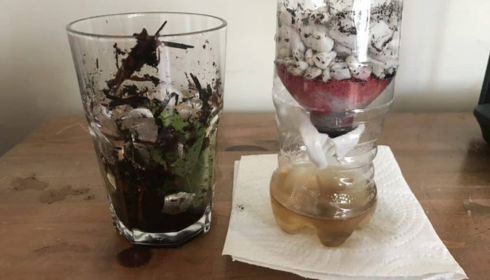
Cut the bottom off your bottle, flip it upside down, and start layering. Cloth at the neck, followed by charcoal, sand, and gravel. The idea is to create a natural filtration path, with each layer catching smaller particles as the water moves down.
So… how does a homemade water filter work, exactly?
It’s all about physical filtration and absorption. As water drips through the layers:
- Gravel grabs large debris like leaves or twigs.
- Sand filters out smaller particles like dirt and dust.
- Charcoal removes some chemicals, odor, and improves taste by absorbing impurities.
how does a homemade water filter work? It’s not magic — it’s just smart layering. The result is clearer, better-tasting water. And yes, you should still boil or treat the filtered water if you’re sourcing it from questionable places, like a pond or rain barrel.
Homemade filters help with clarity and taste, but they’re not guaranteed to eliminate viruses or bacteria. Think of it as your first line of defense — not the final one.
What It’s Really Useful For
- Camping or backcountry hikes where water sources are unpredictable.
- Emergency kits — because who knows when you’ll need clean water fast?
- Science projects — seriously, kids love building these and learning about environmental science.
- Off-grid living or prepping — a non-electric way to clean water is always a plus.
There’s a strange sense of pride in seeing murky water go in and clean water drip out — knowing you made that happen with your own hands.
Common Missteps (and How to Avoid Them)
It’s easy to mess up a homemade filter if you rush it. A few things to watch:
- Don’t skip the rinse. Charcoal and sand can be dusty. Give them a good rinse before loading them into the bottle.
- Don’t expect perfection. This isn’t a reverse osmosis system — it’s a stopgap solution.
- Don’t forget to clean or rebuild it. After several uses, your filter materials will get clogged and less effective.
And again: boil or treat the filtered water if you’re using a natural source. This filter doesn’t kill bacteria or viruses — it just clears out the gunk and improves the taste.
A Quick Note on Materials
You’ll read about all kinds of substitutions online — from using cotton balls instead of cloth to swapping out charcoal for moss. Some work better than others. The key is understanding what each layer does and being smart about what you’re using. If you wouldn’t drink from it, don’t build with it.
That said, the classic trio — gravel, sand, and charcoal — tends to work best. They’re accessible, cheap, and tested by campers, survivalists, and curious DIY-ers alike.
It’s Not Just a Filter, It’s a Skill
Knowing how to build water filters homemade isn’t just useful — it’s empowering. In a world where we rely so heavily on ready-made everything, there’s something grounding about crafting a solution yourself. Especially when that solution has the power to provide safe drinking water.
And hey, maybe you’ll never need it in a survival scenario. Maybe it’ll just sit in the back of your mind as one of those “I know how to do that” things. But if the day ever comes — when the power’s out, the stores are closed, or you’re stuck in the woods — you’ll be glad you do.
Wrapping It Up
At the end of the day, a homemade water filter isn’t about replacing fancy systems. It’s about independence, resourcefulness, and learning something genuinely useful. It’s a great reminder that even with simple tools, we can create something life-sustaining.